Life of a techno-guru
Monday, July 31, 2006
Deploying a BIOS Update to Dell Systems
DISCLAIMER: I am in no way responsible for any damage to any system cause by following the instructions in this article. This is purely informational and should only be used by trained Systems Administrators well-versed in both computer hardware and software. Your actions, your responsibilities. :-)
Introduction
So, if you're a Systems/Network Administrator, a Desktop Admin, or maybe even part of a smaller helpdesk staff, you may be familiar with the task of BIOS upgrades. BIOS upgrades have been a pesky task, often because there hasn't been a method of upgrading large numbers of systems simultaneously, or at least automatically. What I'm going to show you today is how you can use a few simple components to update the firmware on any number of Dell Systems automatically. For simplicity's sake, I'm not going to go into the details of how to actually deploy a script, because that's ultimately up to you, although I'll leave a couple of recommendations for how you could do it.
My Situation
In my particular case, I have approximately 550 client computers needing BIOS upgrades, which consist of a variety of Dell Optiplex GX270 and GX280 small form-factor (SFF) desktops; Most of them are the older 270's. This morning, I happened to notice that on 7/21/2006, Dell released a new revision of the GX270's firmware. This prompted me to investigate some method of deploying the BIOS update, especially since I've come across this situation before, but haven't had the brains to find a real resolution to it; That said, Dell's Support department didn't exactly help that much ... despite a couple calls placed this morning, I ended up telling both technicians I spoke to how to do it in the end. One of them didn't even know what Dell OpenManage was before I told him about it ... *yikes*
What You Need
You really don't need much to complete this seemingly onerous task. Within about the next 15 minutes, I'll bet you have a pretty good idea in mind of how to approach this. The four things you need to mass-update your desktop computer's firmware are:
How It Works
The basic process is going to look something like this:
Deploying Dell's OMCI is pretty simple. You'll want to download the latest version of the client for your system from http://support.dell.com. As of this writing, the most current version if v7.3. After unpacking the file you download from Dell Support, you'll be left with a setup.exe and a couple other files. Setup.exe is the one we want from here; You'll want to run this from the command-line on each computer you want to install the OMCI on: "setup.exe /s /v/qn". This will instruct setup.exe to execute silently, and will pass the /qn CLI parameters to msiexec.exe which instruct it to operate quietly with no user interface. Once you get this packaged up, here's a few methods you could use to deploy it:
Since we are using the OMCI to install the BIOS update, we can't pass the executable file to it, we have to give it an HDR file. If you're using a Windows computer to extract the HDR file, open a command prompt, cd to the folder where the BIOS executable resides, and run the following command: " -writehdrfile " minus the quotes. If you're running a Linux system, Dell has some instructions on how to extract the HDR file from the executable. I'm assuming that most of you will have a Windows workstation available to do these operations on. Now that we've got the HDR file, put it on a network share accessible to your clients (eg. \\server\ITshare), and then let's look at how to create a script to install the new update.
Write a Quick Script
Well, when I said whip up a script earlier on, I really meant it; This script will be 2 lines long and will perform the task of updating the machine's BIOS. First, a little bit of background; The Dell OMCI actually isn't much more than a WMI provider that exposes quite a bit of information and functionality to the WMI service. Once installed though, it started popping up a bunch of messages at me about chassis intrusion, but how to disable those dumb notifications is beyond the scope of this article. Basically, our script will connect to the newly installed namespace (root\dellomci), grab the Dell_Configuration class, and call the FlashBios static method (more on static classes/members), passing it the path to the HDR file as its only parameter, to finally update the system's BIOS. Without further to do, here we go:
set dellconf = GetObject("winmgmts:root\dellomci:Dell_Configuration)
dellconf.FlashBIOS("\\server\ITshare\gx270.hdr")
Yep, that's it. This is what you'll want to run on the systems you want to update with this BIOS version. Pretty simple script isn't it? If you want to investigate more functionality in the OMCI, I encourage you to use the wbemtest utility provided by Microsoft in Windows XP and connect to the root\dellomci namespace. Choose Enum Classes --> Recursive --> OK for a full list of classes in this namespace.
Deploying Your Script
Well, now that we have all the pieces together, we can finally deploy the script to our clients. Again, we can use similar methods as above to deploy the script:
Conclusion
Well, I hope this short tutorial has provided some insight to someone out there. I took the time to write this guide because my own attempts to locate information regarding BIOS deployment failed pitifully. I couldn't really find any firm answers to many of my questions, especially about using OpenManage IT Assistant to send out the firmware updates. No one at Dell could give me straight answers, and no one knew how all the pieces fit together properly. My initial attempts to resolve this predicament began a little over a year ago, but I gave up trying to find information on it. After learning about scripting, WMI, and other general computing concepts, I was finally able to gather the pieces myself and make everything work the way I wanted it to. If anyone would like to ask questions about this tutorial, or about WSH scripting, WMI, or related technologies, I'd love to hear them. Please feel free to e-mail me at pcNOSPAMgeek101 at gmail.com. Until next time ....
Trevor Sullivan ¶ 4:24 PM 4 comments

Introduction
So, if you're a Systems/Network Administrator, a Desktop Admin, or maybe even part of a smaller helpdesk staff, you may be familiar with the task of BIOS upgrades. BIOS upgrades have been a pesky task, often because there hasn't been a method of upgrading large numbers of systems simultaneously, or at least automatically. What I'm going to show you today is how you can use a few simple components to update the firmware on any number of Dell Systems automatically. For simplicity's sake, I'm not going to go into the details of how to actually deploy a script, because that's ultimately up to you, although I'll leave a couple of recommendations for how you could do it.
My Situation
In my particular case, I have approximately 550 client computers needing BIOS upgrades, which consist of a variety of Dell Optiplex GX270 and GX280 small form-factor (SFF) desktops; Most of them are the older 270's. This morning, I happened to notice that on 7/21/2006, Dell released a new revision of the GX270's firmware. This prompted me to investigate some method of deploying the BIOS update, especially since I've come across this situation before, but haven't had the brains to find a real resolution to it; That said, Dell's Support department didn't exactly help that much ... despite a couple calls placed this morning, I ended up telling both technicians I spoke to how to do it in the end. One of them didn't even know what Dell OpenManage was before I told him about it ... *yikes*
What You Need
You really don't need much to complete this seemingly onerous task. Within about the next 15 minutes, I'll bet you have a pretty good idea in mind of how to approach this. The four things you need to mass-update your desktop computer's firmware are:
- Dell OpenManage Client Instrumentation (OMCI)
- Basic Windows Scripting Host skills
- The executable file for upgrading your system's BIOS (I've only tested the GX270's)
- Some method of deploying a script file (I'll get into this later)
How It Works
The basic process is going to look something like this:
- Deploy the OMCI to all client machines (no reboot required)
- Extract the ever so valuable HDR file from the BIOS update executable
- Whip up a quick script that uses the OMCI's WMI provider to flash the BIOS
- Deploy the script
Deploying Dell's OMCI is pretty simple. You'll want to download the latest version of the client for your system from http://support.dell.com. As of this writing, the most current version if v7.3. After unpacking the file you download from Dell Support, you'll be left with a setup.exe and a couple other files. Setup.exe is the one we want from here; You'll want to run this from the command-line on each computer you want to install the OMCI on: "setup.exe /s /v/qn". This will instruct setup.exe to execute silently, and will pass the /qn CLI parameters to msiexec.exe which instruct it to operate quietly with no user interface. Once you get this packaged up, here's a few methods you could use to deploy it:
- Novell Zenworks Desktop Management
- Microsoft Active Directory Group Policy Startup Script
- Microsoft Systems Management Server 2003 Application Package
- Script using WMI's Win32_Process class to spawn a process locally or remotely
Since we are using the OMCI to install the BIOS update, we can't pass the executable file to it, we have to give it an HDR file. If you're using a Windows computer to extract the HDR file, open a command prompt, cd to the folder where the BIOS executable resides, and run the following command: "
Write a Quick Script
Well, when I said whip up a script earlier on, I really meant it; This script will be 2 lines long and will perform the task of updating the machine's BIOS. First, a little bit of background; The Dell OMCI actually isn't much more than a WMI provider that exposes quite a bit of information and functionality to the WMI service. Once installed though, it started popping up a bunch of messages at me about chassis intrusion, but how to disable those dumb notifications is beyond the scope of this article. Basically, our script will connect to the newly installed namespace (root\dellomci), grab the Dell_Configuration class, and call the FlashBios static method (more on static classes/members), passing it the path to the HDR file as its only parameter, to finally update the system's BIOS. Without further to do, here we go:
set dellconf = GetObject("winmgmts:root\dellomci:Dell_Configuration)
dellconf.FlashBIOS("\\server\ITshare\gx270.hdr")
Yep, that's it. This is what you'll want to run on the systems you want to update with this BIOS version. Pretty simple script isn't it? If you want to investigate more functionality in the OMCI, I encourage you to use the wbemtest utility provided by Microsoft in Windows XP and connect to the root\dellomci namespace. Choose Enum Classes --> Recursive --> OK for a full list of classes in this namespace.
Deploying Your Script
Well, now that we have all the pieces together, we can finally deploy the script to our clients. Again, we can use similar methods as above to deploy the script:
- Novell Zenworks Desktop Management
- Active Directory Startup Scripts (untested)
- Remotely spawn a process using the Win32_Process class in WMI (root\cimv2)
- E-mail out a script file to users (unreliable/insecure)
Conclusion
Well, I hope this short tutorial has provided some insight to someone out there. I took the time to write this guide because my own attempts to locate information regarding BIOS deployment failed pitifully. I couldn't really find any firm answers to many of my questions, especially about using OpenManage IT Assistant to send out the firmware updates. No one at Dell could give me straight answers, and no one knew how all the pieces fit together properly. My initial attempts to resolve this predicament began a little over a year ago, but I gave up trying to find information on it. After learning about scripting, WMI, and other general computing concepts, I was finally able to gather the pieces myself and make everything work the way I wanted it to. If anyone would like to ask questions about this tutorial, or about WSH scripting, WMI, or related technologies, I'd love to hear them. Please feel free to e-mail me at pcNOSPAMgeek101 at gmail.com. Until next time ....
Trevor Sullivan ¶ 4:24 PM 4 comments
Wednesday, July 12, 2006
DNS Client :: DNS Resolution Suffixes
What is DNS?
DNS is an interesting, but very well thought-out concept for name-to-IP, IP-to-name, SRV-to-name, and other types of resolution. It is much more versatile than NetBIOS, it's easier to manage, it's more organized, and it just makes sense, plain and simple. DNS also allows you to have multiple servers of the same name, but still be able to tell them apart.
Microsoft's Active Directory relies heavily on DNS and is required for operating an Active Directory Domain. It is required for clients to locate vital services via DNS Service Records (SRV records) such as LDAP, Global Catalogue, and a Kerberos Key Distribution Center (KDC). With this in mind, you ought to realize that without DNS, you can't really have a working Active Directory Domain. So ... what if you have several Active Directory domains and you need to set up proper DNS name resolution on your client machines?
A Multi-Domain Environment
Well, say you have a tri-Active Directory Domain environment with the names DomA.local, DomB.local, and DomC.local, and you need your clients to be able to access resources in each of these domains (in case you haven't guessed, this is the scenario at my current employer). Well, normally (I shouldn't say normally, because these are all old technologies), your clients would resolve names via NetBIOS broadcasts, a HOSTS file (ugh), or WINS, but WINS is dying, so we're left with a pure DNS environment (ahhhhhh, when properly set up, DNS is best). So your clients are most likely pointed to whichever DNS server is authoritative for the client's domain, and when you ping a resource by hostname alone, everything works okay, right? Well, that depends entirely on which domain you are trying to access a resource in. If your client is a member of DomA.local, is pointed at the authoritative server for that domain, and you're trying to access a resource in DomB.local by only its hostname (eg. server01), chances are that you'll be unable to resolve its name properly. Why is this?
A Scenario of Ambiguous Names
When a DNS client attempts to resolve a name in DNS, it must resolve its Fully Qualified Domain Name (FQDN) because you could have an identically named resource that's in a different domain. The DNS suffix (the actual domain name itself) is what separates an identically named resource in DomA.local, DomB.local, and even DomC.local. What this means is that if you have a server named server01 in each of your three domains, your clients would have to resolve it via its FQDN to void the ambiguity of the three identically named servers. So how can you avoid having to type the FQDN of a server if it has an similarly named twin in another domain? Well, you can't! But there is a way to tell your clients which one to locate first, and this is what we'll investigate below.
Also ...
Another scenario may be this: You have a client that is a member of DomA.local. The client needs to resolve the IP of server99.DomB.local, but doesn't specify the domain name (aka domain suffix), only the hostname (server99). If it doesn't try to append DomB.local when resolving the name, it will fail, because DomA.local doesn't have a server99, and it stops there. You must instruct the client to append DomB.local when trying to resolve the hostname in order for it to work properly (this is assuming that your DNS Administrator has properly set up conditional forwarding for each of the domains).
So What Do I Have to Change?
Once you know how the setting is stored, you can then decide on how to change the given setting. The setting in question is a comma-separated string value stored in the HKEY_LOCAL_MACHINE registry hive on each computer. Here is the full path: SYSTEM\CurrentControlSet\Services\TcpIp\Parameters\SearchList. So in order to change this setting, all you need to do is figure out what domains you have (DomA.local, DomB.local, and DomC.local), and decide on what order you would like clients to resolve names in. In most, if not all, circumstances your clients should first try the domain suffix which they are a member of (eg. client is member of DomA.local, and should therefore attempt to resolve names to that domain first) so that they can contact Domain Controllers and such properly, but beyond that it's basically up to you what order you'd like them to try name resolution in. Basically, you'll end up having a string value looking like "doma.local,domb.local,domc.local". If you ever add a 4th domain (DomD.local), just append a comma and the domain name to it.
 And How Do I Change It?
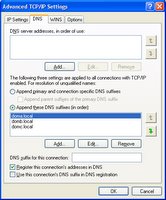
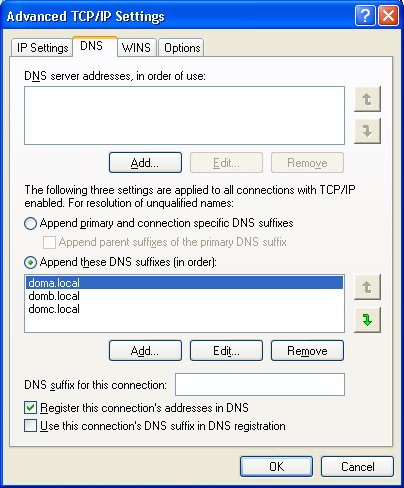
In Windows, the DNS client's Default Search Suffix(es) is configurable via the TCP/IP properties of a particular network adapter. This setting tells the client which Domain Names (aka Suffixes) to append to a hostname, when only a hostname is provided, to attempt to resolve its name. Multiple domains can be specified, and the top one is always tried first, followed by the 2nd, 3rd, and so on. If none of the FQDNs generated by appending the suffix to the hostname can be resolved, the client will fail. Setting this option through the Windows GUI is easy (see screenshot), but how, as a desktop administrator, can you configure this option on 10 clients at once? What about 50, or 500?
I Knew You'd Say That ...
Yes indeed, once again in our lifetime, we'll need to write a script to change this. As you probably can recall from a previous article, I showed you how to change registry data with a Visual Basic Script plus the added strength of WMI. You don't need WMI and can also change registry data with a Wscript.Shell object which we'll review here briefly; The nice thing about WMI is that you can run one script locally on your management workstation or server, instead of having to delpoy a script to all your workstations. We'll write one script to see how to change the actual registry value using a Wscript.Shell object, and then we'll write a script with WMI and ADSI/LDAP to grab all your computer accounts from your Active Directory domain, and connect to each of them to change this value. Here goes:
'Create a shell object
set myShell = CreateObject("Wscript.Shell")
'Write the registry value
myShell.RegWrite "HKEY_LOCAL_MACHINE\SYSTEM\CurrentControlSet\Services\TcpIp\Parameters\SearchList","doma.local,domb.local,domc.local"
Simply save that text to a file with a vbs extension and double-click it. OMG was that hard or what? Two lines of actual code to accomplish our simple administration task? It cannot be! My hope is that you realize that programming/scripting is not as hard as it seems, and that you too can master it even if you haven't started, or just recently starting learning it. The code to connect to a directory service and use WMI is almost just as easy, it's just a little bit more code. For simplicity purposes, this script will assume that all your computer objects are in the default Computers container in Active Directory.
'Get the RootDSE LDAP object
set oLDAP = GetObject("LDAP://RootDSE")
'Extract the domain name in LDAP format
myDomain = oLDAP.Get("defaultNamingContext")
'Get the default computers container in your domain
set oLDAP = GetObject("LDAP://cn=computers," & myDomain)
'For each computer object in the computers container, call the updateDNSSearchOrder method with the computer's name LDAP attribute
for each item in oLDAP
if item.class = computer then updateDNSSearchOrder(item.name)
next
'Create a function that takes the target PC name as a parameter
function updateDNSSearchOrder(computername)
'Get a WMI object on the remote machine pointing to the StdRegProv class in the root\default namespace
set objWMI = GetObject("winmgmts:\\" & computername & "\root\default:StdRegProv")
'Set the string value using the SetStringValue method of the StdRegProv class. Note the comma at the beginning. Because HKEY_LOCAL_MACHINE is the default hive, you don't need to specify the value for it
objWMI.SetStringValue ,"SYSTEM\CurrentControlSet\Services\TcpIp\Parameters","SearchList","doma.local,domb.local,domc.local"
end function
There, that wasn't so bad was it? If you remove all the comments in the code, it's only a few lines long, in fact it's exactly 10! Not bad at all for making a domain-wide change! Anyway, I hope you learned something from this tutorial! Feel free to e-mail me if you have any questions at pcNOgeekSPAM101@gmail.com!
¶ 9:45 AM 0 comments
DNS is an interesting, but very well thought-out concept for name-to-IP, IP-to-name, SRV-to-name, and other types of resolution. It is much more versatile than NetBIOS, it's easier to manage, it's more organized, and it just makes sense, plain and simple. DNS also allows you to have multiple servers of the same name, but still be able to tell them apart.
Microsoft's Active Directory relies heavily on DNS and is required for operating an Active Directory Domain. It is required for clients to locate vital services via DNS Service Records (SRV records) such as LDAP, Global Catalogue, and a Kerberos Key Distribution Center (KDC). With this in mind, you ought to realize that without DNS, you can't really have a working Active Directory Domain. So ... what if you have several Active Directory domains and you need to set up proper DNS name resolution on your client machines?
A Multi-Domain Environment
Well, say you have a tri-Active Directory Domain environment with the names DomA.local, DomB.local, and DomC.local, and you need your clients to be able to access resources in each of these domains (in case you haven't guessed, this is the scenario at my current employer). Well, normally (I shouldn't say normally, because these are all old technologies), your clients would resolve names via NetBIOS broadcasts, a HOSTS file (ugh), or WINS, but WINS is dying, so we're left with a pure DNS environment (ahhhhhh, when properly set up, DNS is best). So your clients are most likely pointed to whichever DNS server is authoritative for the client's domain, and when you ping a resource by hostname alone, everything works okay, right? Well, that depends entirely on which domain you are trying to access a resource in. If your client is a member of DomA.local, is pointed at the authoritative server for that domain, and you're trying to access a resource in DomB.local by only its hostname (eg. server01), chances are that you'll be unable to resolve its name properly. Why is this?
A Scenario of Ambiguous Names
When a DNS client attempts to resolve a name in DNS, it must resolve its Fully Qualified Domain Name (FQDN) because you could have an identically named resource that's in a different domain. The DNS suffix (the actual domain name itself) is what separates an identically named resource in DomA.local, DomB.local, and even DomC.local. What this means is that if you have a server named server01 in each of your three domains, your clients would have to resolve it via its FQDN to void the ambiguity of the three identically named servers. So how can you avoid having to type the FQDN of a server if it has an similarly named twin in another domain? Well, you can't! But there is a way to tell your clients which one to locate first, and this is what we'll investigate below.
Also ...
Another scenario may be this: You have a client that is a member of DomA.local. The client needs to resolve the IP of server99.DomB.local, but doesn't specify the domain name (aka domain suffix), only the hostname (server99). If it doesn't try to append DomB.local when resolving the name, it will fail, because DomA.local doesn't have a server99, and it stops there. You must instruct the client to append DomB.local when trying to resolve the hostname in order for it to work properly (this is assuming that your DNS Administrator has properly set up conditional forwarding for each of the domains).
So What Do I Have to Change?
Once you know how the setting is stored, you can then decide on how to change the given setting. The setting in question is a comma-separated string value stored in the HKEY_LOCAL_MACHINE registry hive on each computer. Here is the full path: SYSTEM\CurrentControlSet\Services\TcpIp\Parameters\SearchList. So in order to change this setting, all you need to do is figure out what domains you have (DomA.local, DomB.local, and DomC.local), and decide on what order you would like clients to resolve names in. In most, if not all, circumstances your clients should first try the domain suffix which they are a member of (eg. client is member of DomA.local, and should therefore attempt to resolve names to that domain first) so that they can contact Domain Controllers and such properly, but beyond that it's basically up to you what order you'd like them to try name resolution in. Basically, you'll end up having a string value looking like "doma.local,domb.local,domc.local". If you ever add a 4th domain (DomD.local), just append a comma and the domain name to it.
 And How Do I Change It?
In Windows, the DNS client's Default Search Suffix(es) is configurable via the TCP/IP properties of a particular network adapter. This setting tells the client which Domain Names (aka Suffixes) to append to a hostname, when only a hostname is provided, to attempt to resolve its name. Multiple domains can be specified, and the top one is always tried first, followed by the 2nd, 3rd, and so on. If none of the FQDNs generated by appending the suffix to the hostname can be resolved, the client will fail. Setting this option through the Windows GUI is easy (see screenshot), but how, as a desktop administrator, can you configure this option on 10 clients at once? What about 50, or 500?
I Knew You'd Say That ...
Yes indeed, once again in our lifetime, we'll need to write a script to change this. As you probably can recall from a previous article, I showed you how to change registry data with a Visual Basic Script plus the added strength of WMI. You don't need WMI and can also change registry data with a Wscript.Shell object which we'll review here briefly; The nice thing about WMI is that you can run one script locally on your management workstation or server, instead of having to delpoy a script to all your workstations. We'll write one script to see how to change the actual registry value using a Wscript.Shell object, and then we'll write a script with WMI and ADSI/LDAP to grab all your computer accounts from your Active Directory domain, and connect to each of them to change this value. Here goes:
'Create a shell object
set myShell = CreateObject("Wscript.Shell")
'Write the registry value
myShell.RegWrite "HKEY_LOCAL_MACHINE\SYSTEM\CurrentControlSet\Services\TcpIp\Parameters\SearchList","doma.local,domb.local,domc.local"
Simply save that text to a file with a vbs extension and double-click it. OMG was that hard or what? Two lines of actual code to accomplish our simple administration task? It cannot be! My hope is that you realize that programming/scripting is not as hard as it seems, and that you too can master it even if you haven't started, or just recently starting learning it. The code to connect to a directory service and use WMI is almost just as easy, it's just a little bit more code. For simplicity purposes, this script will assume that all your computer objects are in the default Computers container in Active Directory.
'Get the RootDSE LDAP object
set oLDAP = GetObject("LDAP://RootDSE")
'Extract the domain name in LDAP format
myDomain = oLDAP.Get("defaultNamingContext")
'Get the default computers container in your domain
set oLDAP = GetObject("LDAP://cn=computers," & myDomain)
'For each computer object in the computers container, call the updateDNSSearchOrder method with the computer's name LDAP attribute
for each item in oLDAP
if item.class = computer then updateDNSSearchOrder(item.name)
next
'Create a function that takes the target PC name as a parameter
function updateDNSSearchOrder(computername)
'Get a WMI object on the remote machine pointing to the StdRegProv class in the root\default namespace
set objWMI = GetObject("winmgmts:\\" & computername & "\root\default:StdRegProv")
'Set the string value using the SetStringValue method of the StdRegProv class. Note the comma at the beginning. Because HKEY_LOCAL_MACHINE is the default hive, you don't need to specify the value for it
objWMI.SetStringValue ,"SYSTEM\CurrentControlSet\Services\TcpIp\Parameters","SearchList","doma.local,domb.local,domc.local"
end function
There, that wasn't so bad was it? If you remove all the comments in the code, it's only a few lines long, in fact it's exactly 10! Not bad at all for making a domain-wide change! Anyway, I hope you learned something from this tutorial! Feel free to e-mail me if you have any questions at pcNOgeekSPAM101@gmail.com!
¶ 9:45 AM 0 comments
Friday, July 07, 2006
Firefox Rant
Okay, Firefox is really starting to annoy me. Don't get me wrong, it's a fabulous browser, and I could go on for hours (almost literally) about why it's better (yes, it is unarguably much better) than Microsoft's Internet Explorer. Some of the nicest things about Firefox are:
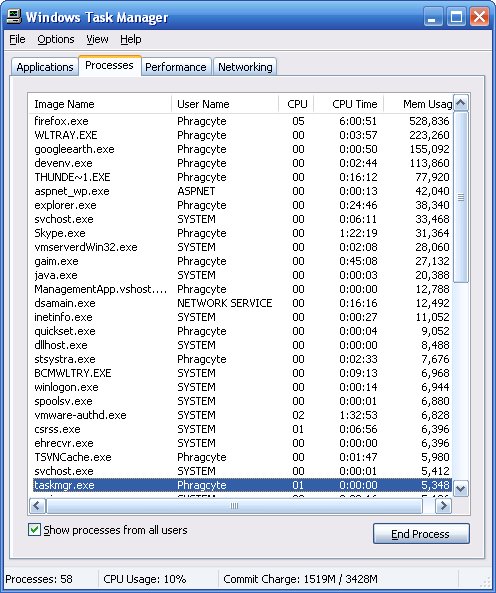
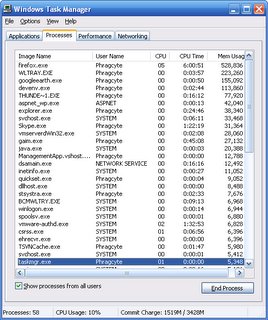 Okay, so there I've named off exactly (wow) 10 points that I like about Firefox without really even trying to think of much. Now why am I going off on a rant about why I dislike it? Well, maybe because my laptop has 2GB of RAM in it, and Firefox is using TWENTY-FIVE percent of it! (see screenshot to the left) I currently have FIVE tabs open in Firefox, nothing special, no big images, no embedded flash objects, no media player objects. Just text, some basic images in the respective web pages, and that's it. Why in heaven's name would Firefox be using 512MB+ of RAM for five tabs? I've read stuff on this phenomenon before, and people say it's not memory leaks, they say it's because Firefox caches stuff in memroy. That may or may not be true, but all I know is that I really don't appreciate Firefox using up 25% of my RAM; That's not caching, that's either a memory leak, or they need to fix the amount of caching that Firefox does. Also, did you notice the 6 hours of CPU time there? My laptop has been running for 16 days now, and Firefox has used 6 hours of CPU time. The system process on here has only used half of that, and everybody complains about Explorer's use of CPU time, and that's only 24 minutes. Firefox is a generally good browser, but talk about a resource hog! I wouldn't recommend people with computers older than maybe a year or two to use Firefox ... it's either that, or when Firefox is open for a while, you might as well kiss other program's access to system resources goodbye. Anyway, make your own judgments about Firefox, but I'm seriously thinking about trying Opera for my daily browsing tasks. It seems to run a lot quicker, and there isn't lag opening tabs after a while like Firefox has. Okay, I'm done.
¶ 11:45 AM 0 comments
Okay, so there I've named off exactly (wow) 10 points that I like about Firefox without really even trying to think of much. Now why am I going off on a rant about why I dislike it? Well, maybe because my laptop has 2GB of RAM in it, and Firefox is using TWENTY-FIVE percent of it! (see screenshot to the left) I currently have FIVE tabs open in Firefox, nothing special, no big images, no embedded flash objects, no media player objects. Just text, some basic images in the respective web pages, and that's it. Why in heaven's name would Firefox be using 512MB+ of RAM for five tabs? I've read stuff on this phenomenon before, and people say it's not memory leaks, they say it's because Firefox caches stuff in memroy. That may or may not be true, but all I know is that I really don't appreciate Firefox using up 25% of my RAM; That's not caching, that's either a memory leak, or they need to fix the amount of caching that Firefox does. Also, did you notice the 6 hours of CPU time there? My laptop has been running for 16 days now, and Firefox has used 6 hours of CPU time. The system process on here has only used half of that, and everybody complains about Explorer's use of CPU time, and that's only 24 minutes. Firefox is a generally good browser, but talk about a resource hog! I wouldn't recommend people with computers older than maybe a year or two to use Firefox ... it's either that, or when Firefox is open for a while, you might as well kiss other program's access to system resources goodbye. Anyway, make your own judgments about Firefox, but I'm seriously thinking about trying Opera for my daily browsing tasks. It seems to run a lot quicker, and there isn't lag opening tabs after a while like Firefox has. Okay, I'm done.
¶ 11:45 AM 0 comments
- The about:config page that allows you to configure almost anything
- Tabbed browsing
- Search as you type :: I love this
- Clear Private Data :: Keep your personal data secure
- Nice bookmark manager
- Keyboard shortcuts to open/close/switch tabs, and more
- Extensions :: I use Forecast Fox, Adblock, and SessionSaver (not using SS right at the moment though)
- Page source viewer and nicely organized Page Properties window
- Resizable text :: This is great for my laptop's high-res LCD panel, ouch on the eyes
 Okay, so there I've named off exactly (wow) 10 points that I like about Firefox without really even trying to think of much. Now why am I going off on a rant about why I dislike it? Well, maybe because my laptop has 2GB of RAM in it, and Firefox is using TWENTY-FIVE percent of it! (see screenshot to the left) I currently have FIVE tabs open in Firefox, nothing special, no big images, no embedded flash objects, no media player objects. Just text, some basic images in the respective web pages, and that's it. Why in heaven's name would Firefox be using 512MB+ of RAM for five tabs? I've read stuff on this phenomenon before, and people say it's not memory leaks, they say it's because Firefox caches stuff in memroy. That may or may not be true, but all I know is that I really don't appreciate Firefox using up 25% of my RAM; That's not caching, that's either a memory leak, or they need to fix the amount of caching that Firefox does. Also, did you notice the 6 hours of CPU time there? My laptop has been running for 16 days now, and Firefox has used 6 hours of CPU time. The system process on here has only used half of that, and everybody complains about Explorer's use of CPU time, and that's only 24 minutes. Firefox is a generally good browser, but talk about a resource hog! I wouldn't recommend people with computers older than maybe a year or two to use Firefox ... it's either that, or when Firefox is open for a while, you might as well kiss other program's access to system resources goodbye. Anyway, make your own judgments about Firefox, but I'm seriously thinking about trying Opera for my daily browsing tasks. It seems to run a lot quicker, and there isn't lag opening tabs after a while like Firefox has. Okay, I'm done.
¶ 11:45 AM 0 comments
Okay, so there I've named off exactly (wow) 10 points that I like about Firefox without really even trying to think of much. Now why am I going off on a rant about why I dislike it? Well, maybe because my laptop has 2GB of RAM in it, and Firefox is using TWENTY-FIVE percent of it! (see screenshot to the left) I currently have FIVE tabs open in Firefox, nothing special, no big images, no embedded flash objects, no media player objects. Just text, some basic images in the respective web pages, and that's it. Why in heaven's name would Firefox be using 512MB+ of RAM for five tabs? I've read stuff on this phenomenon before, and people say it's not memory leaks, they say it's because Firefox caches stuff in memroy. That may or may not be true, but all I know is that I really don't appreciate Firefox using up 25% of my RAM; That's not caching, that's either a memory leak, or they need to fix the amount of caching that Firefox does. Also, did you notice the 6 hours of CPU time there? My laptop has been running for 16 days now, and Firefox has used 6 hours of CPU time. The system process on here has only used half of that, and everybody complains about Explorer's use of CPU time, and that's only 24 minutes. Firefox is a generally good browser, but talk about a resource hog! I wouldn't recommend people with computers older than maybe a year or two to use Firefox ... it's either that, or when Firefox is open for a while, you might as well kiss other program's access to system resources goodbye. Anyway, make your own judgments about Firefox, but I'm seriously thinking about trying Opera for my daily browsing tasks. It seems to run a lot quicker, and there isn't lag opening tabs after a while like Firefox has. Okay, I'm done.
¶ 11:45 AM 0 comments
